Blog
How to box your bicycle for your next cycle touring adventure
HOW TO PREPARE: An 8 part series to get you ready for your first TDA tour. Click here to read more.
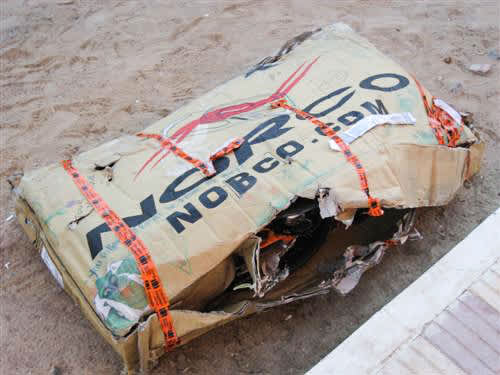
It’s summer in the northern hemisphere, and many of you will soon embark on your next cycling tour. Whether it’s for a self-organized ride with friends in a neighbouring state or province, or an organized group cycle tour in Europe, Africa, South America or elsewhere, you need to know how to box your bike so that when you land it doesn’t look like this…
I’ve been travelling with my bike for over 15 years to destinations all across the globe and on many different airlines. So I thought I would share some advice with you to make your next bike boxing a quick and (mostly) painless exercise.
>>Related: Find your next cycle tour using our Tour Finder
I have broken the process down into three simple steps:
- Disassemble
- Protect
- Pack
You will need a few things to complete the job:
- Bike box (usually available from your local bike shop)
- Pedal wrench
- Multi tool
- Tape
- Packing materials like foam, bubble wrap, and cardboard
I suggest you watch the video first, and then read the more detailed step by step instructions below if anything in the video wasn’t clear. I apologize in advance that I am not the most engaging YouTube celebrity, but I do have some useful advice, so take four minutes and watch the video.
Step 1: Disassemble
On most bikes you will need to remove the pedals, seat/seatpost, front wheel, and handlebars. This will ensure that the overall width, length, and height of your disassembled bike will fit in the cardboard box. Most bike boxes are large enough that you don’t need to remove the rear wheel.
TIP: CHANGE THE GEARS FIRST
One detail that we didn’t mention in the video – change gears in both the front and back so that the chain and derailleur is at its closest position to the frame. This will keep everything further from potential damage.
PEDALS
![MMFX8670.MOV_snapshot_00.04_[2016.07.06_12.16.21]](https://res.cloudinary.com/dev-content/w_600,h_337,c_fit/cdi/2016/07/MMFX8670.MOV_snapshot_00.04_2016.07.06_12.16.21.jpg)
Pedals can be tricky. Sometimes they require a lot of torque to loosen. Make sure you are turning them in the right direction. The pedal on the left side of the bike turns in the opposite direction as compared to most other bolts and screws in the world. A good way to remember this is to turn the pedal wrench towards the back of the bike when loosening. Many modern pedals will have an allen or hex key slot in the back of the pedal. If you don’t have a proper pedal wrench, this is a convenient alternative.
If the pedal is really hard to remove, make sure the pedal is near the lowest point of its rotation, and stand over the bike on the opposite side to the pedal you are loosening. This way you are able to keep the bike still and use your upper body strength more effectively to loosen the pedal.
SEAT AND SEATPOST
Now you can loosen the bolt holding the seatpost in place. On many bicycles, this may be a quick release lever instead. In that case, open the quick release and pull out the seat and seatpost assembly. You can now tighten the seatpost bolt or put the quick release back in the locked position. Otherwise, you could remove these and store them along with your other small parts.
HANDLEBAR AND STEM
![MMFX8690.MOV_snapshot_00.11_[2016.07.06_12.18.27]](https://res.cloudinary.com/dev-content/w_600,h_337,c_fit/cdi/2016/07/MMFX8690.MOV_snapshot_00.11_2016.07.06_12.18.27.jpg)
On most bikes, the faceplate that holds the handlebar to the stem is secured with two or four bolts. Loosen these bolts and gently lower the handlebar (still attached by the cables) and let it hang next to the frame. Reattach the faceplate using the four bolts so that it doesn’t get lost.
TIP: ROTATING THE STEM AND/OR FORK
If the stem (the piece that attaches the handlebar to the frame and fork) gets in the way, you may need to loosen it and turn it 180 degrees. Just remember to tighten it again when reassembling your bike. Alternatively, you could rotate the fork and stem together without loosening any bolts. Just be aware that this might expose the disc brakes to more potential damage in transit. So if you do this make sure the disc brake gets lots of padding.
FRONT WHEEL
Open the quick release skewer. Then, while holding the nut end of the skewer, rotate the lever counter clockwise five or six turns. This will allow the wheel to slide out of the frame. Hold the fork with one hand and lift it up while you pull the wheel out with the other hand. Set the fork gently down on the ground and set the wheel aside.
TIP: DON’T FORGET THE SMALL PARTS
A common mistake is to remove all these pieces and forget to put them into the bike box afterwards. So as soon as the wheel and seatpost are removed, set them somewhere in your workspace where you can’t possibly forget them. And pack the small parts (pedals, skewers, etc) immediately into a small box to eventually be loaded into the bike box.
Step 2: Protect your bike
![MMFX8715.MOV_snapshot_00.16_[2016.07.06_12.20.42]](https://res.cloudinary.com/dev-content/w_600,h_337,c_fit/cdi/2016/07/MMFX8715.MOV_snapshot_00.16_2016.07.06_12.20.42.jpg)
Airport baggage handlers are not typically known for their light touch, so assume that your bike will get roughed up, and generally abused in transit. This is especially true if you have connecting flights through airports that aren’t used to handling bicycles.
FRAME PADDING
This helps to prevent scratches and superficial damage. Any part where there is metal on metal contact will likely rub and create surface damage. Secure your padding with some tape. Packing tape, or even masking tape or electrical tape works fine for this step. The tape is mostly to hold it in place and not to tighten it against the frame.
TIP: IT DOESN’T HAVE TO BE FANCY
If you don’t have fancy foam tubing like we had in the video, you can use cardboard, old clothing, or anything else that will create a soft, protective layer. Inner tubes, bubble wrap, even rolled up newspapers/magazines can work well too.
FORK STABILIZER
This little plastic piece can be slotted into the end of the fork where the wheel normally sits. Ask at the bike shop for one when you pick up your box. If you don’t have one, consider stuffing something fairly stiff in between the two fork blades to prevent the forks from being crushed if the box is laid flat and has a lot of weight on it. Something like your camp mattress, a rolled up spare tire, or some tightly rolled bits of cardboard would work.
SECURE THE HANDLEBARS
![MMFX8723.MOV_snapshot_00.23_[2016.07.06_12.22.54]](https://res.cloudinary.com/dev-content/w_600,h_337,c_fit/cdi/2016/07/MMFX8723.MOV_snapshot_00.23_2016.07.06_12.22.54.jpg)
Your handlebars have exposed parts like brake levers and shifters that can easily be damaged in transit. The cables that run from the handlebars to the brakes and derailleurs also limit how far you can move the handlebars. Every type of handlebar requires a different packing technique, meaning that this can sometimes be a challenging part of the process.
Gently pull the handlebar into position along the right hand side (drivetrain side) of the bike. Try a few different positions before securing the bar. Rotate it and turn it to see what works best but be aware that you don’t want to put a kink in the cables. The cables can be gently pulled and shifted around, but once the handlebars are secured the cables should not be under a lot of tension.
Using zipties or tape, tightly fasten the handlebar to the frame making sure that there is no metal on metal contact. The handlebars should now be snug against the frame, and not protruding too far out in any direction.
SECURE THE CRANK TO THE DOWNTUBE
Make sure you are securing the crankarm on the right side of the bike (we want to leave space on the left side to put the front wheel in the box next to the frame). Securing the crank like this will prevent the chain and gears from rotating in transit and potentially damaging other equipment.
PROTECT THE REAR DERAILLEUR AND ANY OTHER EXPOSED PARTS
The rear derailleur can be easily damaged or bent if not properly protected. Cover it with some padding as we did in the video, but also think of what could be placed behind or around it to prevent crushing or bending damage (later in the video, we used a tent to act as protection in this area – this works well).
This would would also be a good time to add some padding to the shifters and brake levers on the handlebars.
PROTECT THE WHEEL AND BRAKE ROTOR
![MMFX8735.MOV_snapshot_00.06_[2016.07.06_12.26.10]](https://res.cloudinary.com/dev-content/w_600,h_337,c_fit/cdi/2016/07/MMFX8735.MOV_snapshot_00.06_2016.07.06_12.26.10.jpg)
First, remove the quick release skewer from the wheel, tighten the nut back onto the skewer, and place it in the box with your pedals and other small parts.
If you have disc brakes, a nice trick that you saw in the video is to cut out a slot in a doubled-over piece of cardboard. Slide this in behind the brake rotor, fold it over the front, and tape it in place. This will help prevent the rotor from being bent or from damaging the frame.
Next, put some foam or cardboard over the other side of the wheel hub. This is the side of the wheel that will sit up against the bike box, so by placing something against the wheel here, it spreads out the force and will prevent the wheel from poking a hole in the bike box.
Step 3: Pack your bike into the box
![MMFX8778.MOV_snapshot_00.30_[2016.07.06_12.27.55]](https://res.cloudinary.com/dev-content/w_600,h_337,c_fit/cdi/2016/07/MMFX8778.MOV_snapshot_00.30_2016.07.06_12.27.55.jpg)
PUT THE FRAME IN THE BOX FIRST
The disassembled frame and handlebar should now be one secure piece with no loose or dangling parts. Carefully lower it into the box. You will have to shuffle it back and forth until you find where it sits best.
TIP: PADDING THE BOTTOM OF THE BOX
Before loading the bike in the box, you might consider laying down a few more piece of cardboard at the bottom to create a thicker layer at the front of the box where the fork sits. This will prevent the fork from pushing through the box.
WHEEL AND SEATPOST
The front wheel should be placed on the left hand side – opposite the drive side. The wheel never sits in perfectly on the first try, so move it around, and pull the sides of the bike box apart gently so that you can see down to the bottom and find the best positioning for the wheel.
Wrap the seatpost in some cloth or foam tubing so the greasy post doesn’t make a mess. Secure the seatpost to the frame with zipties or tape wherever if fits best – ensuring there is no metal on metal contact.
SMALL PARTS BOX AND ACCESSORIES
Now find a place for your small parts box that contains your pedals and skewer. Usually at the very bottom is best – sometimes next to the rear wheel or closer to the front under the downtube next to the front wheel. Don’t forget things like your bike shoes, helmet, and spare tubes. None of these should be loose in the box. Ziptie or tape them to the bike.
TIP: MAKE SURE YOU AREN’T PACKING ANY BANNED ITEMS
Check with your airlines baggage restrictions. Things like CO2 inflation cartridges and chain cleaner / chain lube are not permitted on most airlines.
PACKING IN YOUR CAMPING GEAR
![MMFX8751.MOV_snapshot_00.01_[2016.07.06_12.29.10]](https://res.cloudinary.com/dev-content/w_600,h_337,c_fit/cdi/2016/07/MMFX8751.MOV_snapshot_00.01_2016.07.06_12.29.10.jpg)
Though some airlines have a policy that no camping gear or other gear should be inside the bike box, in practice, this has never been an issue for me. It’s a big advantage to be able to use the bike box to pack some of the bulkiest camping equipment such as your tent, sleeping bag, and mattress. It has the added benefit of being a great protective layer from exposed parts of the bikes such as the rear derailleur, and front brake rotor. With that in mind, slide your camp gear into the box where it fits the best and protects best. I find placing the tent in vertically as I did in the video works really well.
TIP: EVERY BIKE IS DIFFERENT
Every single bike packs differently, and bike boxes vary in size and shape, so don’t be surprised if it doesn’t go as smoothly as you hoped on the first try. Just keep experimenting and follow the steps as they apply to your situation and modify where necessary.
TAPE UP THE BOX
First, put a few pieces of tape across the top to hold it closed. Run your palm along the tape after you place it to make sure it has adhered properly to the cardboard, and that large bubbles are pushed out. Then tape along the seams. Use lots of tape!
FIXING ANY TEARS IN YOUR BIKE BOX
![MMFX8757.MOV_snapshot_00.18_[2016.07.06_12.37.01]](https://res.cloudinary.com/dev-content/w_600,h_337,c_fit/cdi/2016/07/MMFX8757.MOV_snapshot_00.18_2016.07.06_12.37.01.jpg)
Most bike boxes you get from your bike shop won’t be in perfect condition, so you should do a few repairs. The hand holds are important when you are lugging the box to the airport. The baggage handlers will use these as well. Reinforce all the hand holds with tape across its top edge (you can fold the tape into the hand hold for added strength), and vertical or diagonal pieces on either side of the hand hold.
REINFORCE THE CORNERS
This is especially important for the bottom corners of the box where it is likely to be dragged, or dropped. Tightly wrap some tape diagonally around the bottom corner, and then another few pieces horizontally along the sides where it meets the corner. Again, use generous amounts of tape and run your palm along each taped piece to make sure it sticks.
TIP: ONLY USE PACKING TAPE, NOT DUCT TAPE
I only use packing tape for the outside of the bike box. Duct (gaffers) tape is intentionally meant to tear when pulled at. Packing tape is both strong and flexible to maintain strength when the box is jostled and carried.
CONTACT INFO
Airlines do occasionally lose baggage and bike boxes, but it is very rare that it is permanently lost. Usually what happens is your bike box might not make it onto your connecting flight, and it gets set aside to be sent the following day on the same flight.
To reduce the chances of anything going wrong, and to help airline staff figure out where the bike is going if the baggage tag gets ripped off, put your flight details and your destination address on the box. If you don’t know the address of where you’ll be staying, try to at least put a hotel or campsite name, and your email address for them to follow up with you. Make sure you put the correct flight details, and DO NOT put the address of where you flew from – only where you are headed.
TIP: BRING TAPE TO THE AIRPORT
Bring a roll of packing tape with you to the airport. It’s quite common for security to want to look inside the box. Occasionally your box may not fit in the oversized baggage x-ray machine, and in that case each piece may need to be sent through individually (this happens very rarely).
Questions?
 Still confused about how to box your bike? Post your questions in the comments area below and I would be happy to help.
How to Prepare
An 8 part series to get you ready for your first TDA tour. Click here to read more.


21 Comments for "How to box your bicycle for your next cycle touring adventure"
Really cool video, and love the site. No idea how I’ve not come across you guys sooner, but subscribed now so shouldn’t miss anything in the future 🙂
Really helpful tips…love it. I’m going Kansas the next week..your solid tips will help me to pack my cycle properly.
I’m conscious about disassemble and assemble the bike….I hope I can do it well….. 🙂
A well-researched, perfectly-described, to the point tips and suggestions on packing the bike. Fully professional writing. 😀
It will be helpful for everybody who needs to know a bit on this issue.
And one question- what do you think to do with the chain lubrication?
Thank you for these. 🙂
Thanks Howard. I appreciate the feedback. We tried to be as thorough as possible…
Regarding chain lube. It can be messy, so no harm wiping off the excess before you start disassembling the bike. It’ll save your clothes and keep the box neater. Inevitable the oil/dirt/grim will end up on your seat, or handlebars, which means inevitably on you.
The best video I have seen. keeps it really simple and precise.
A must for all us global tourers
Thanks Peter! We had fun putting it together. If you had any questions that weren’t answered here, let me know! Happy to help…
[email protected]
An excellent practical presentation which works.
Thanks David! We had fun putting it together.
You didn’t mention anything about deflating your tyres. In my experience, the tyres may not explode at altitude, but the airline staff will ask you if you have done so. If you haven’t then it’s a real pain to open the box and reach in to release the valves after boxing.
Instead of buying foam padding to protect the frame, you can instead wrap old bicycle tubes around the frame.
I find it’s easier to remove the whole stem w/ handle bars from the steering tube rather than undo all the bolts in goose neck faceplate.
Making sure the bike is clean of all dirt is important for many destinations to avoid problems with customs biosecurity (eg. NZ and Australia). Mountain bikes in particular.
Lastly, when reassembling the bike, flatten the box and use it as a protective surface rather than scratching the bike on a rough surface. It’s otherwise easy to find a dropped screw/bolt if you’re reassembling on grass.
Those are all excellent tips Peter.
It’s strange but I always forget to deflate tires, but have never been asked too. Better safe than sorry though – so I agree – you should deflate.
Thanks for adding your advice to the conversation. Happy pedalling…
Great video. However, I have a problem and that is that after 18 months of touring SE Asia through 3 monsoon seasons my seat has become jammed, rusted perhaps to the frame and cannot be removed and thus it will be sticking out of the top of the box, saddle will be removed though. Any advice?
Cheers
Great video. However, I have a problem and that is that after 18 months of touring SE Asia through 3 monsoon seasons my seat post has become jammed, rusted perhaps to the frame and cannot be removed and thus it will be sticking out of the top of the box, saddle will be removed though. Any advice?
Cheers
Yes, that can happen. Depending on how seized it is inside the frame, it can require some heavy duty equipment to remove – if it can be at all. I suggest doing your best to pack it up as is, and when you get it home take it to a bike shop. They might be able to use penetrating oils, a table vice and/or other tools to get more leverage and hopefully remove the pesky seat. Good luck and congrats on your SE Asian adventures!
Great video Shanny. Thank you.
I have a suggestion and a question for you.
Sugg.: line the inner sides of the box with corroplast (plasticised cardboard, kinda. Name may vary by country). Really strengthens the box against pokes and consequences or tears. Cheap to get from local printers or ad agencies. Corroplast is often used for outside poster and ads)
Question: what about travelling with disk breaks. Any special care to give to oil lines against pressure issues? I really wonder (new bike with disk brks.).
Hope we can freely travel again soon… ?
Thx!
Thanks François, nice idea. If you were worried about extra weight, than you could use the plastic cardboard just on the parts pushed up against the sides of the box.
As for your question, I don’t know the answer. But we do recommend that people in general do not bring hydraulic (oil) disc brakes simply because they are possibly more problematic in travel and harder to deal with if they need repairs on the side of the road or in small villages not familiar with repairing them. Cable actuated disc brakes are the way to go for touring.
I have made 3 trips to Europe with hydraulic disc brakes with no problems. just don’t forget to insert disc brake spacers like this (the orange pad thing https://www.bike-components.de/cache/p/xl1/6/7/Shimano-Disc-Brake-Pad-Spacer-for-BR-M315-BR-MT200-BR-MT400-universal-universal-67516-258572-1553603091.jpeg) or your brakes will be very spongey and may need bleeding…
How about Di2. I usually remove the derailleur and seatpost battery.
I also have hydraulic disc brakes and have made 3 trips to Europe with no problems. just don’t forget to insert disc brake spacers like this (the orange pad thing https://www.bike-components.de/cache/p/xl1/6/7/Shimano-Disc-Brake-Pad-Spacer-for-BR-M315-BR-MT200-BR-MT400-universal-universal-67516-258572-1553603091.jpeg) or your brakes will be very spongey and may need bleeding…
So well done Shanny!
glad you enjoyed it!
What is the size of the box? Dimensions H x L x W, please….
Hi Vipul, they vary in size. For ones where you take off just the front wheel (not both) I believe it would be roughly 140 x 25 x 90cm